Mod Description
If you want your car looking better than cleanMod Details
PremiumNo Difficulty
 Mod ID859
CreditA2D
For
Mod ID859
CreditA2D
For


 Linkhttps://www.evilution.co.uk/mod/detailing-your-smart.htm Copy to Clipboard
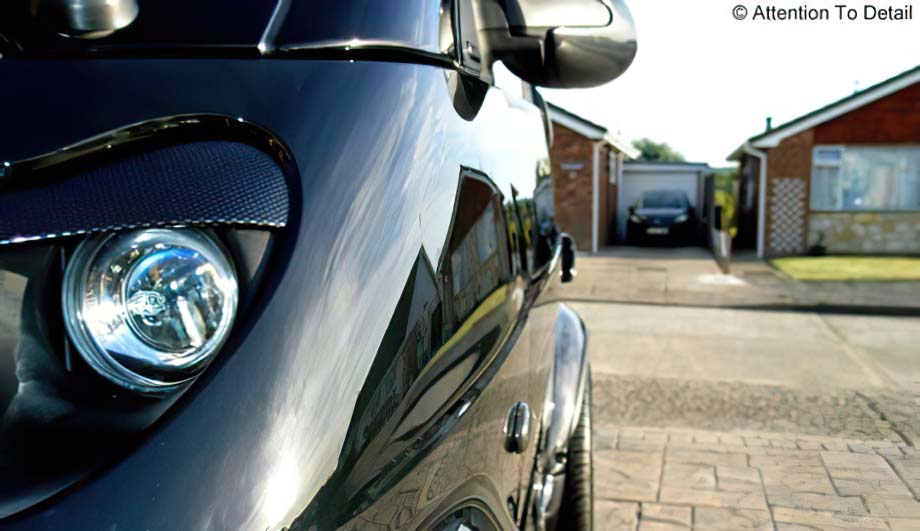
Clean Is OK, Detailed Is Better
Just because there is no dirt on the car, doesn’t mean it looks good. Scratches and damage to the paintwork can make it look dull and lifeless. With a handful of hours, a shed load of patience and some basic gear you can have your car looking even more shiny than when it left the dealer.
Detailing Your Smart
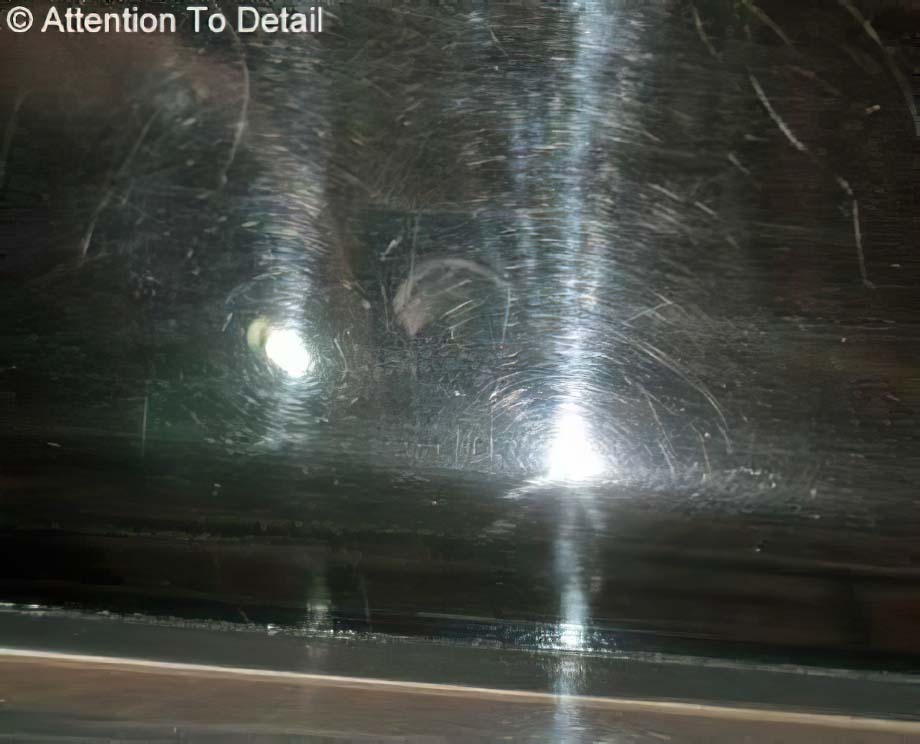
We all wash our cars with the aim of maintaining their appearance and to keep them looking great. Unfortunately, the majority of paint damage and light scratches are caused during the wash stage itself. Products and techniques fall short of what is needed resulting in actually damaging your cars paintwork.
The guide below should help correct some of the issues and keep our Smarts looking great!
Wheels First
Never under estimate how much of a difference properly cleaned wheels can make to your car’s overall appearance. It’s always best to rinse your wheels first and if you have a pressure washer at your disposal, flush out the wheel arches too. If you are using a Pressure washer, never get too close and try to always spray at an acute angle and never point on at 90 degrees.
Wheel cleaner or not? Most of the time you shouldn’t need a wheel cleaner, keeping it for more in depth work only (say once every 6 months or so). If you do choose to use a wheel cleaner, be careful what you choose. Too aggressive and you can get into trouble, especially on sensitive finishes! However if you do opt for a wheel cleaner, make sure you rinse your wheels thoroughly after using it and then wash with bodywork shampoo to ensure the cleaner is fully removed.
Now let me abolish a bad urban myth, not all acidic wheel cleaners are bad, in fact in some cases they are a necessary evil (and as we know, not all that is evil is bad!). In fact some non acidic, alkaline wheel cleaners can be just as dangerous, if not more! The key is understanding how they should be used and respecting their power.
Make sure whichever wheel cleaner you choose that you follow the dilution instructions and wear some form of gloves to stop the chemicals coming into prolonged contact with your skin. Avoid cleaners that boast outrageous claims, they can often be too strong and more harmful than good (especially for those with factory coated Brabus wheels).
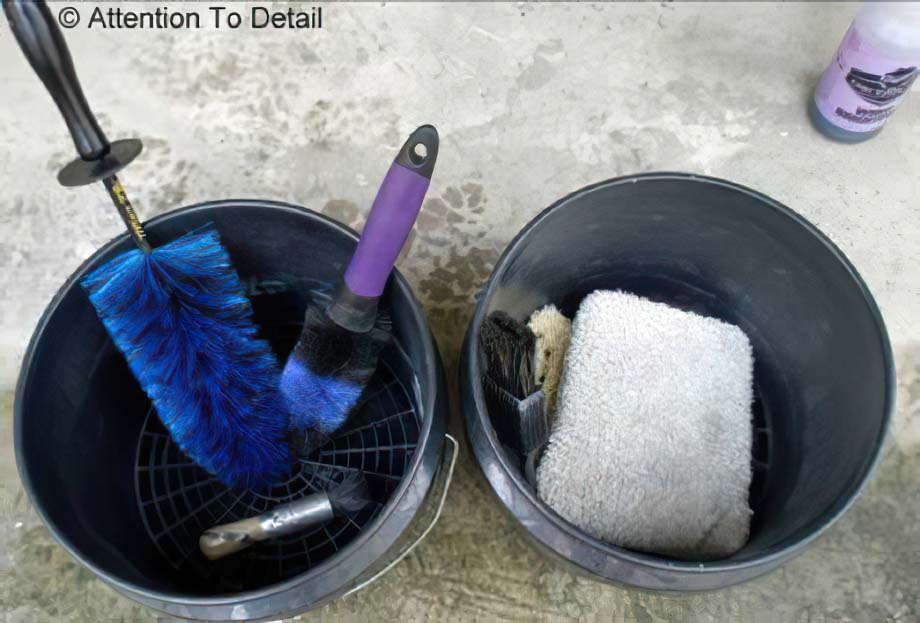
At this point you should have your wheel cleaner in a spray bottle (preferably with a foaming nozzle) and two buckets (see below for further information). When cleaning your wheels, get your hands on as many brushes as you can, allowing you to get into all the awkward areas and then an old wash mitt to give them a final wipe over. This will make your life much easier. With the brushes, make sure the bristles aren’t too stiff and that they have no bare metal collars (and if they do wrap them in electrical/gaffa tape)
Start by applying a good coat of wheel cleaner/shampoo, and allow it to soak for a minute or two (never allow any product to dry on a painted surface, it can stain and potentially cause long term damage). Using your brushes, clean the lip, lug nut holes and wheel face, getting in all the nooks and crannies.
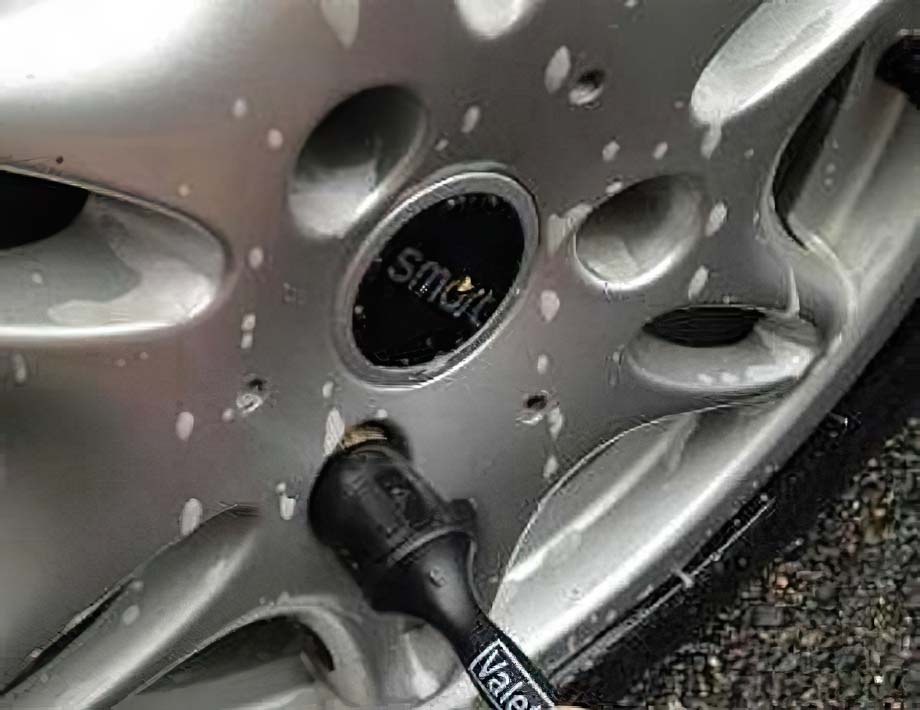
Then if you a have a spoke brush as above, move onto giving the backs of the wheel a good tickle. Twist the brush as you pull it towards you, reducing the splash back you would normally get and also cleaning the back of the spokes as you do.

Now grab your wash mitt and give the wheels a final clean with your wash solution, rinsing off any wheel cleaner as you go. Don’t forget to poke your finger round the back of the spokes to ensure they’re clean, and reducing the chance of brake dust corroding your wheels from behind. Finally rinse your wheels thoroughly with an open tap pressure from a hose or watering can. You want plenty of rinse water to get rid of any remaining wheel cleaner or shampoo. As above, when you have done washing the rest of the car, revisit the wheels once more with you mitt and wash solution to be double sure you got rid of all the wheel cleaner, and rinse again.
Prewash
Modern clear coats are ‘scratch sensitive’ so before we even think about putting a cleaning hand anywhere near the paint we should try to remove as much of the loose dirt and contaminants first. Now this can range from anything like running an open pressured hose over the car to advanced citrus cleansers and snow foams designed to break down and soak off the dirt and contaminants.
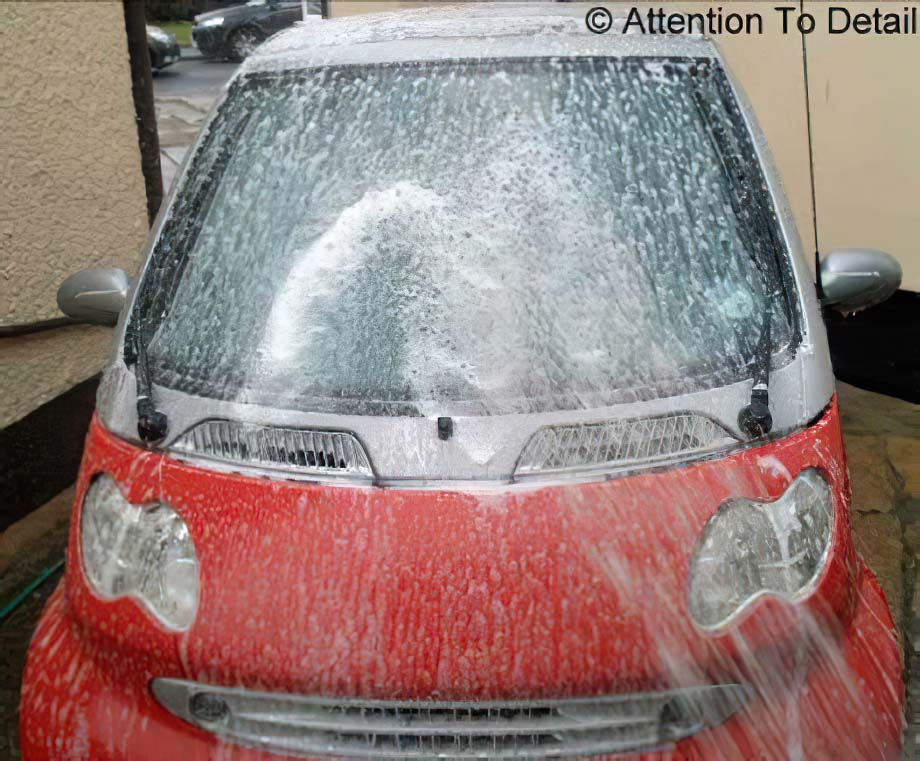
If you’re doing this on a budget take some car wash solution and a spray bottle (a well rinsed out old household cleaner bottle will do) and dilute to its recommended ratio. With the car in the shade liberally spray the contents over the entire car (especially the lower and heavier soiled panels) starting from the top, working your way down. After a few minutes, the dirt should have softened and you can take your hose/watering can/pressure washer and rinse the solution off hopefully carrying some of the dirt with it.
Of course this will do little to road salts, tar, and other bonded contaminants but it will certainly not hurt. If you do want to help remove these then look into the many pre cleaners and snow foams on the market (feel free to contact me for more advice on these). The holy ‘two bucket method’

Yes you do need two. Gone are the days of using one bucket, a 99p sponge and then throwing the dirty water over the car at the end!
The two buckets are made up of one containing your chosen wash solution, diluted to the recommended ratio, and the second clean rinse water. The idea here is to remove the dirt from the car with the wash solution and release it from the mitt into the rinse water, rather than reintroducing it to your wash solution. Gently swish the dirty mitt in the rinse bucket and then return to the nice clean wash solution. This also ensures that the wash solution isn’t over clogged, allowing it to perform to its best all the way through the wash process (the solution can only handle so much dirt before its desired properties become exhausted). Oh and don’t chuck anything over the car at the end!
If you’re feeling flush (or just car mad like me) then you should also consider using grit guards in both buckets. These create a static water trap at the bottom of the bucket and ensure any larger contaminants are not reintroduced to the mitt. These may seem odd but make a huge improvement to your wash technique and drastically cut the amount of wash induced scratches into the paint!
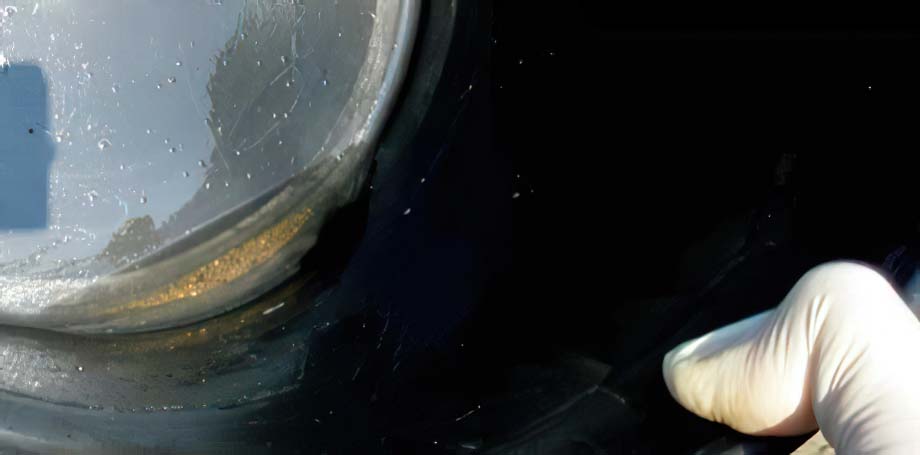
Here you can see just what is caught from a moderately dirty car. Would you scrub that into your paint???
Ok so we’re ready to ‘make contact’… But not with that 99p sponge!
Sponges generally trap dirt between their own surface & the paint, creating a big yellow sanding block!!! So what should you use instead?
Wash mitts offer a much safer option, but wait, which type? Well there are two key types of wash mitts available, microfibre, and (Merino) Lamb’s wool mitts. The main difference is microfibre mitts are man-made and will last forever (if properly cared for, albeit they can become stiffer over time) and you can chuck it in the washing machine after use (never use soft rinse or tumble dry any microfibre). Lamb’s wool is softer, making it gentler on delicate surfaces, but will normally perish within 9-12 months, as it is a natural fur, but to best care for it you should gently rinse it after each use and never leave it to dry out fully. The choice is yours, but if you’re a regular detailer, and have a delicate/new paint finish, go for lambswool (I do!). Oh and never use the same mitt on your wheels as you do on your bodywork! I opt for a soft Merino wool mitt for my car’s bodywork, and a tougher, hard wearing Microfibre mitt for the wheels.
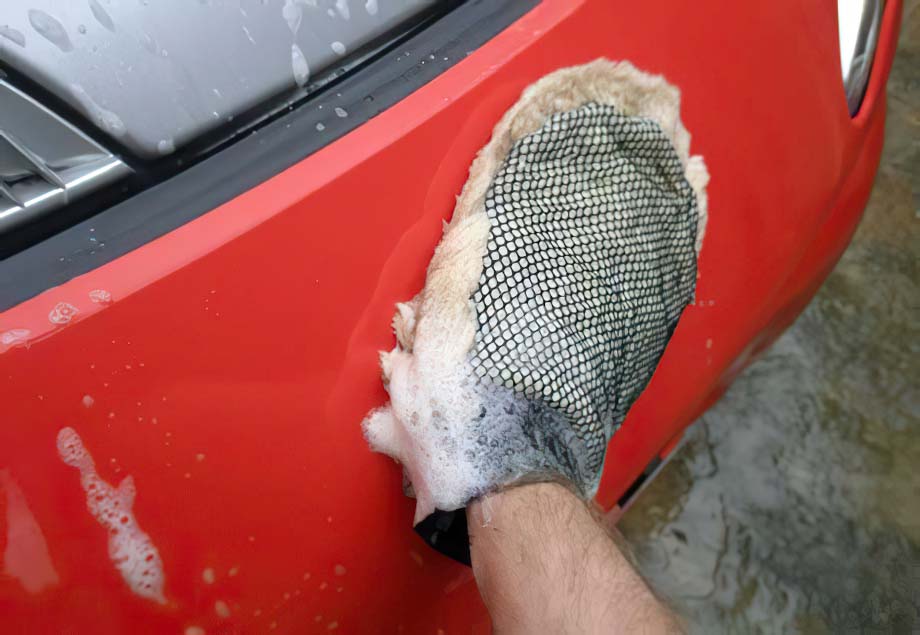
When using your mitt always apply even and light pressure, allowing your mitt to glide over the surface, the only time you apply pressure to your paints surface is if you’re polishing. Period! Wash one panel at a time, your wash mitt will lift the dirt from the paints surface and hold it in its long fibres until rinsed in your rinse bucket. Once rinsed take another scoop of clean wash solution (and plenty of it, you aim to use it all by the end of your car) and wash the next panel. Avoid circular motions and stick with methodical straight, overlapping passes. The reason for this is that should the worst happen, the scratches are easier to remove than circular, erratic ones.
Start from the top of the car, moving round it in a circular direction (roof, then glass work, bonnet, door, boot, door, then lower panels etc), washing the dirt down the car as opposed carrying it up the car. This also ensures you tackle the dirtier lower panels last and keep your mitt cleaner for longer. With the last dribbles of wash solution wipe down your door shuts.
Rinsing
Now your cars all clean take a hose/ watering can and rinse your car down by using the open pressure to ‘sheet’ the water off. Bring the hose close to the panel, with the water running across the panel like a blade. The waters own low surface tension and weight should pull most of the water down the car leaving less to dry. Again follow the same path as when you washed the car, from top to bottom, ensuring you remove all traces of your wash solution. Because your car is in the shade, allow a minute or so before starting to dry your car (good time to tidy up you wash kit).
Drying
Now if anyone says ‘chamois’, or ‘Drying Blade’…. Just don’t!
Think about it, all the precautions you took during the wash stage while the car was wet and lubricated and now it’s almost dry you’re going to drag some unforgiving cloth over it or worse yet collect any airborne dirt that has settled in the mean time on the paint with a plastic blade and scrape it all over your paint…..!?
First thing you should think about is re-lubricating the surface with a spritz of quick detailer (the choices are endless!), a good quality waterless rinse, or one of the many drying aide sprays. This step is crucial and will on its own transform your routine and the appearance of your car. Not only that, it can make this task faster and easier!
The aim here is to add a small amount of lubrication to the paint, and also breakdown any water deposits that could leave water spots on the surface, ruining the finish. Quick Detailers also offer the added benefit of often adding a small amount of protection & gloss. Apply this one panel at a time sparingly before drying the surface.
When drying ideally a large microfibre towel should be used that has an absorbing long pile on one side, and short buffing pile on the other. Failing that you can also use several normal microfibres, changing as they become soaked through/dirty.
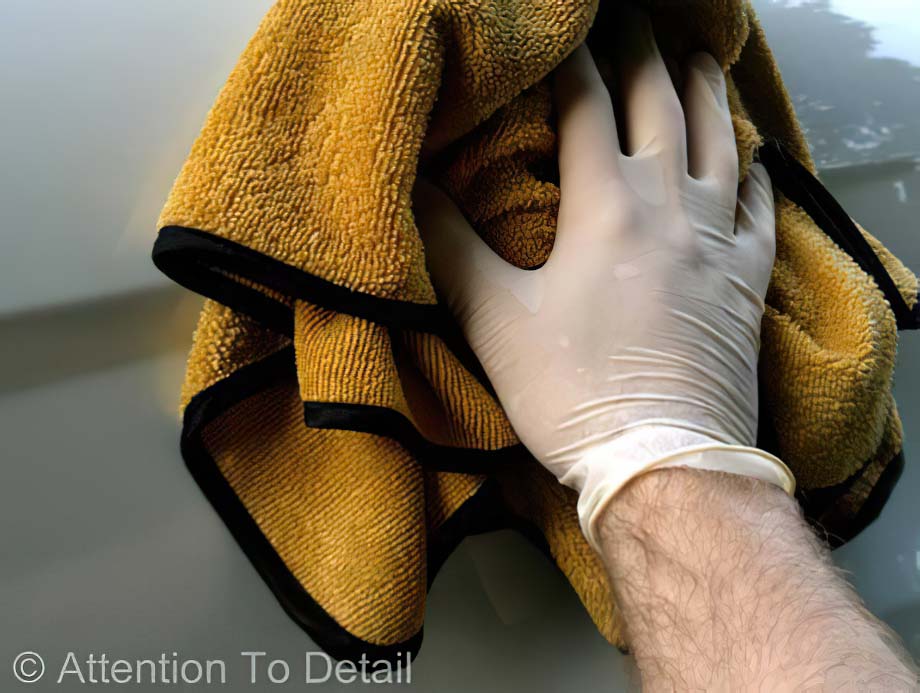
Again start at the top and work your way round to bottom as per the wash stage above. On the first horizontal panel, open up your towel and lay it out flat to soak up the laying water. There are two reasons for this, 1st you are soaking up all that water without rubbing & scrubbing (these panels will have more laying water to remove than vertical ones and so require more drying), and 2nd, microfibres dry better and are softer when damp. After a few seconds grab the end of to towel nearest you and with a slow upward motion pull it towards you, bringing the water with it. Complete this across the whole panel, leaving a small amount of water.
Apply a quick spritz of whichever quick detailer you decided upon, and fold your towel until palm size (2-3 times). Folding the towel neatly ensures that even pressure is applied and any uneven hand pressure is absorbed by the towel. Now GENTLY (remember, no pressure unless polishing) wipe the panel until dry, turning to the shorter pile for the last few passes. Always turn to a fresh portion of the towel as you move to a new section. When it comes to collected water around light clusters etc hold the folded microfibre against the section for a few seconds. Microfibre is thirsty stuff, able to hold up to 10x its own weight in water!!
If you’re really out to impress take your quick detailer, a fresh microfibre, and take another tour round the car, spritzing slightly more (each panel should have an even light misting) and buff gently to a good shine. Again, most Quick detailers include a form of protection, keeping you paint shiny and safe for longer!
Stand back. Admire!
Seems Like All Too Much Hassle?
Yeah, same here. I can rarely be bothered to even wash my car. However, help is at hand. All you have to do is throw money at someone and they do it for you.
Mark from Attention 2 Detail (Essex area) will be doing mine. He’s a smart owner so he knows how to make them shine.