Narrow your search
Modification Details
Translate Evilution
german french spanish italian greek finish danish polish japanese russian
Search Evilution
Most Viewed Pages
Most Rated Pages
450 Cabrio Roof Fix
We are starting to see quite a few cabrios having roof problems.
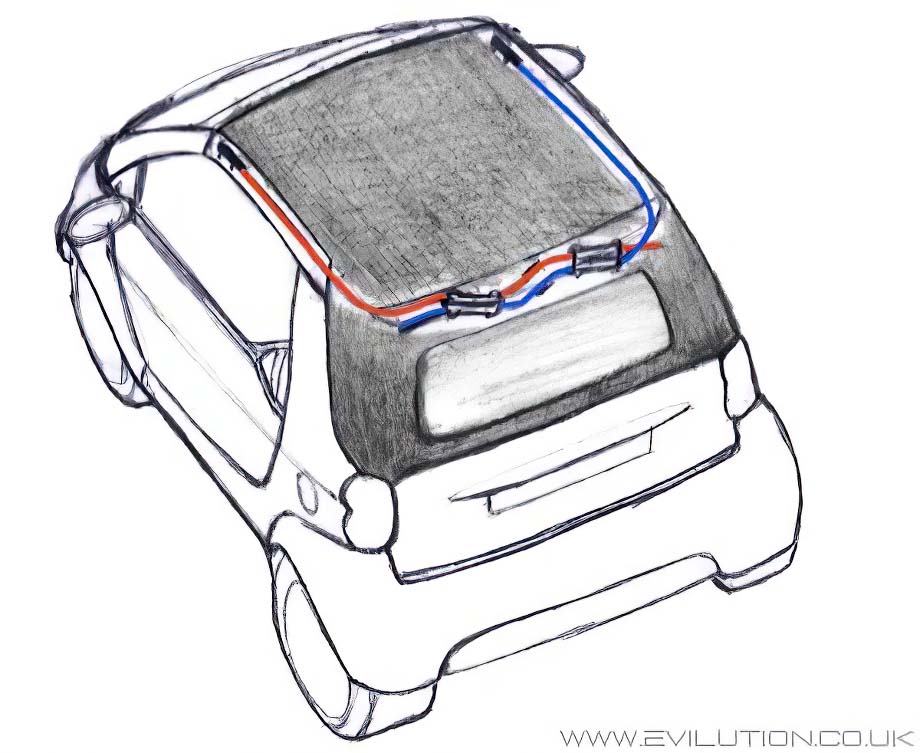
The Cabrio Roof Mechanism

The roof is moved using a pair of identical motors placed either side of the rear
roof section, these don't do one side each, instead they work with each other
to move the entire roof. A pair of sprung cables pass over either side of the
motors main gear allowing both cables to be moved simultaneously.


Thanks to Telmo Rodrigues for the excellent diagram.

The canvas section contains 3 ribs that connect across the car to each cable allowing each rib
to move backwards eventually coming to rest next to each other. The canvas of the roof
concertinas from one rib to the other to make the entire roof more compact on opening.

Cabrio Roof Problem

Although the main drive cog in the motors are metal, they seem to wear quickly as there
isn't a great deal of surface area on the mating faces. Eventually the cogs start to slip
over the spring cables causing a clicking nose and eventually a loss of all roof control.

The sprung cables are constructed to have thousands of microfilaments along the length,
this helps retain grease, reduces friction and expels foreign matter that may get caught up.
The microfilaments eventually wear down and break, they accumulate in the tubes
and especially around the motor main gear and worm drive. These could eventually
cause the white grease to clog up the mechanism.

The obvious fix is to replace the spring cables and the motor
main gear which is what this how2 is going to show you.

The Smart Fix

When smart started getting problems with cabrio roofs they took an unusual line to fix it.
Instead of changing over the damaged motor and the cables, they just remove the problem motor.

This meant that 1 motor wasn't slipping and going out of sync with the other motor.

This made the remaining motor take the entire load of the roof during its operation.
Although this works for a while, it is more of a money saving exercise and won't last.

Webasto - the company who designed and built the roof, apparently had no input
into the fix that smart use. They do not recommend running the roof on one motor.

Smart have been doing the fix on cabrios, sometimes without telling the owner.
It is worth checking first to see if you have 1 or 2 motors before buying the repair kit.

Parts Needed

Go to Smart and order part number 0019674 V001 0000 00 Repair set e-drive.

If you are doing both motors you need two sets, you will have cables and connectors
left over, but keep them as spares or sell them. This is because smart will assume
you have 1 motor so only give you parts to upgrade 1.

These are the bits you get in each single upgrade kit.
  • 2x cables, left and right
  • 3x extended motor bolts
  • 2x white insert clips
  • 2x runner connectors
  • 1x motor main cog
  • 1x zip tie

    So you see, if you have 2 motors you will need 6 bolts and 2 main cogs.


    Drop the roof down, remove the side bars, then lift the roof back up into this position,
  • so that it is motorised/locked in the up position.


    Remove the inside cover to expose the motor(s).
    If you have 2 motors, remove the one you think you are having problems with.

    If you just have the 1 motor you might want to leave it in for now to motorise the cables out. The motors are held in with Torx25 bolts. Lower the motor and disconnect it.


    This shows the gear on top of the motor that retract the roof cables.
    Note the swarf and wear on the cog teeth.


    This cog sits in the hole in the centre of the holder and the cables pass along either side.


    Cover the interior and seats with a sheet to protect from the white grease.

    Press these buttons on both sides at the same time, this will fool the roof into thinking that you have the side bars fitted and will allow the roof to spit out! Have an assistant wind the roof out via the emergency roof keys or simply press the roof forward button until the cable come out about 18 inches.

    The cables will disconnect themselves from the front rib


    At this point the roof will fall down into the car, you will need to support it carefully so as to not damage the roof or the car. DO NOT pull the roof out any more than this or the other slide will fall out too, making the job even harder.


    Note cable holes/routes and location/position of slide tracks etc as
    you will need to slide them back into these same holes.


    Note the location of the little white clip, you will replace this clip later on.


    Pull the old cables all the way out and bin them both.


    Fold it up and over towards the front of the car, you will have to bend it out a
    touch to get it to clear the roof fabric.


    Rotate the cam to the correct position so you can remove the plastic part.


    Here are the new and old ones


    Reinstall onto the cam using the correct left or right handed part, swing back over the top towards the rear in the opposite way you removed it.


    Insert the new white plastic clip.


    The guides should sit like this if you have got them the correct way round


    Smart now give longer bolts because they strengthen the single motor modification.
    I suggest you fit them to both of your motors when refitting.


    This shows the new cables the right way around with the cable outwards.
    Left and right hand side as shown.


    The guides will slot together like this.


    Carefully push both the new cables in at the same time,
    ensure they do not bend. Keep both side straight and level.


    Push both guides and cable in together until they both are hard home in this position.


    With the cover off of the motor(s), swap over the main cog with the new one from the kit.


    Refit the upgraded motor(s) with the roof still in this position.
    Make sure the roof is straight when you install the motor(s).


    Now you have fitted the motor(s) back into position you can motorise the roof back down and operate the roof as normal. Regrease all of the guides and runners etc with white grease.

    Extended Information

    Gavin from Spain contacted me to say he had a similar problem with clicking motors. On closer inspection found that the cabrio roof motors were loose and a simple retightening of the bolts solved the problem straight away. Worth checking out before hand.


Click if Info Helpful

Buy me a drink

Contact us about mod

Print page

Translate

Back to top