Narrow your search
Modification Details
Translate Evilution
german french spanish italian greek finish danish polish japanese russian
Search Evilution
Most Viewed Pages
Most Rated Pages
Servicing The Clutch Actuator
It is becoming more and more common to hear of slower gear changes, increased revs before the clutch engages and smart being unable to adjust the clutch on their Star machine. Something new was shown to me.
Originally there were 3 options to fixing a slipping/badly adjusted clutch.

Have the clutch actuator retaught on a star machine

If that couldn't be done as the machine bought up errors,

New clutch actuator fitted

This was the option given to me at smart. If that didn't work.

Fit a new clutch.

This is all a bit of trial and error as the symptoms are pretty much the same. Trying all of the above can cost you nearly £1000 and shockingly may not sort the problem.

The Story

S2EagleEye fitted a performance clutch and adjusted it mechanically and electronically.
The clutch worked and felt fine for about 50 miles then started slipping and over revving on gear changes. The clutch was adjusted again which sorted it out.

Strangely, 50 miles later it had reverted back to its previous state.

An entirely new performance clutch was fitted yet the problem remained.

Suspecting the actuator was faulty he swapped it over for another unit.
Adjusted it correctly and was dismayed when, again, it started playing up.

That's when he decided to take a closer look at the actuator.

The Clutch Actuator

Here it is in situ, under the car just behind the intercooler scoop.


With the (circled above) bolts removed it is easily removed from the car.


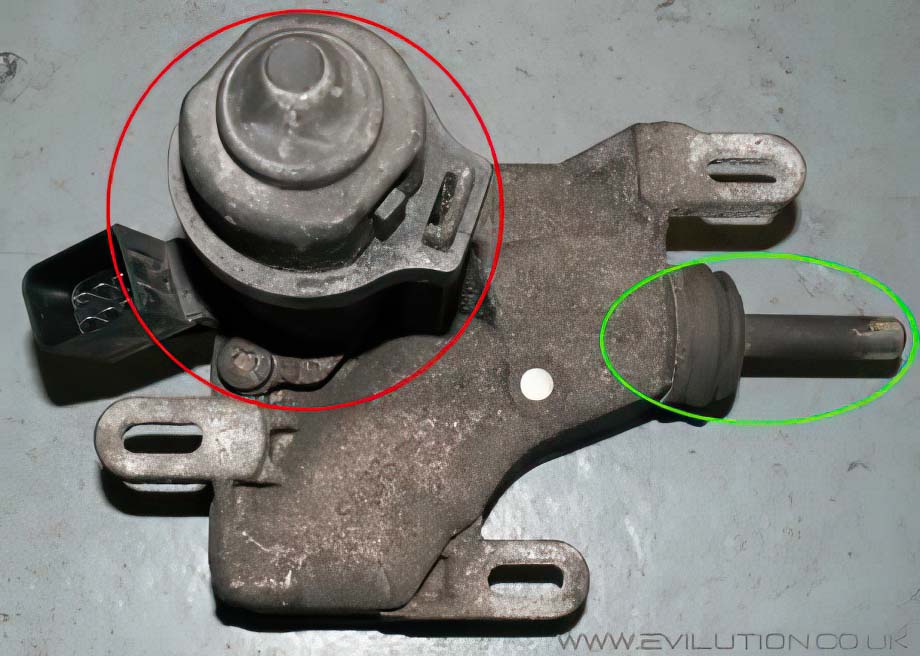
The electric motor circled in red uses a worm drive to move a crescent gear,
this crescent gear moves an arm on a pivot. The arm connects to the clutch
actuator rod (circled in green) which moves the clutch.

The 2 Main Problems

Firstly the seal between the case and the clutch actuator arm is rubbish.
It's a loose fit on both ends and isn't physically held on at the case end
using either jubilee clip or a zip tie. Given the units exposed placement under the car,
the poor seals allow road grime, water, dirt and small grit to enter the workings.

It's quite obvious that grit and cogs don't mix.

The second problem is the construction of the actuator.
Surprisingly all the internals are made of nylon, although this isn't a major problem,
it is when grease is applied. Plastic eventually absorbs the grease causing a breakdown
of the structure. Although i'm sure smart has used a special grease that won't.

The biggest drawback is a combination of the 2 problems.
The poor seal allows dirt and water to enter the case which mixes with the grease.
We all know what happens when when grease and water mixes,
you get an emulsion resembling mayonaise. Add dirt to that and
you have a mixture that will slow down the whole mechanism.

The Fix

Firstly, remove the motor by removing the bolts around it and pulling it out.
Clean it and the worm drive with a rag. Do not use WD40 to clean it.
Buy yourself a can of white lithium spray grease, it lubricates and protects the internals.

Again, don't feel the urge to clean it out with WD40.
WD40 is a jack of all trades, primarily it is a water dispersant but it also contains
cleaners, anti corrosion, penetrator agents and lubricant. Although this sounds good, it isn't.
WD40 will pentrate the plastic and eventually starts absorbing water.

Pull off the rubber seal and pull out the actuator rod, it is held in by a ball and socket.
Using brake cleaner spray with a straw attachment, spray an absolute shed load in it
but hold it so the excess can run straight out. The spraying should displace the dirt and grit.

When it looks clean, shake the excess cleaner out . Replace the motor and spray inside
the actuator with a liberal dose of white lithium grease. Refit the actuator arm and rubber seal
and take the opportunity to zip tie the rubber seal to the case to stop further dirt ingress.
Do not use anything else to lubricate the internals of your actuator.

Refit to car.

Anatomy Of The Actuator

It is worth noting the compensator spring, this will be the part that creates
the force against the actuator arm. Therefore there is a possibilty that the
compensator spring could lose its strength over time. This would add to the
chance of clutch slippage and why a new actuator would fix the problem.


Thanks to Matt for the above photo.

Conclusion

After having the clutch mechanically and electronically adjusted, the gear change
was improved but the problem returned. After servicing the clutch actuator, 
the clutch problem disappeared and hasn't yet returned.


Click if Info Helpful

Buy me a drink

Contact us about mod

Print page

Translate

Back to top