

Mod Description
No two ways about it, paddleshift is cool and there is more than one way to go about it.Mod Details
PremiumNo Difficulty
 Mod ID423
CreditEvilution
Cost££80+
For
Mod ID423
CreditEvilution
Cost££80+
For
 Linkhttps://www.evilution.co.uk/mod/450-paddle-shift.htm Copy to Clipboard
Activating The Paddleshift
There are two methods to activating paddleshift on your smart.
Gearshift PCB
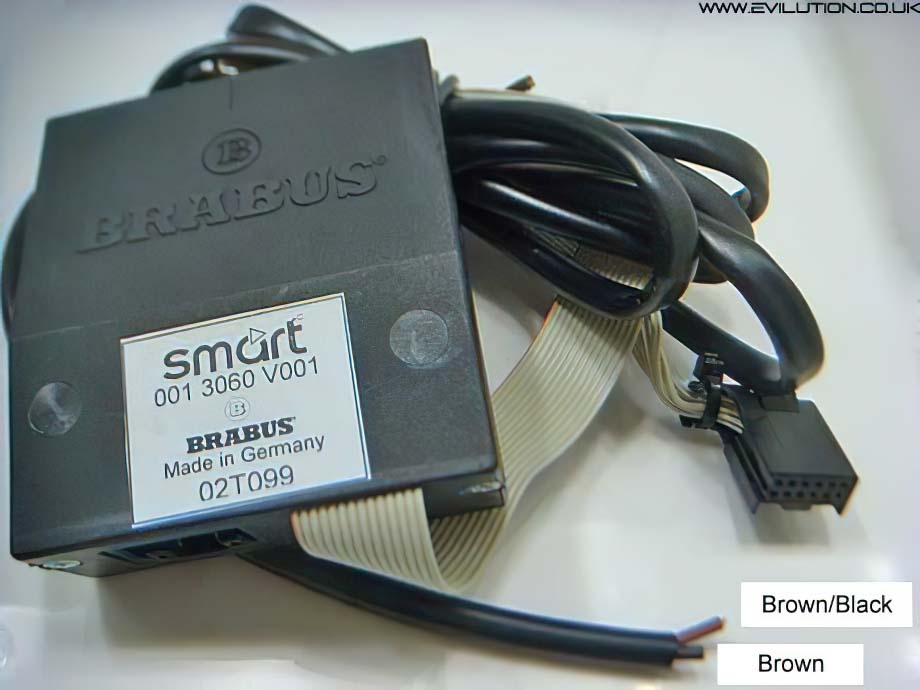
Smart part number 001 3060 V001
Works on all 600cc, 700cc and 800cc fortwos and the Roadster. The 451 even uses the same gear stick control unit (SE Drive) so logic dictates that it should work on those too, HOWEVER… The PCBs expect the paddle and horn resistances found in a 600cc steering wheel so if you fit a 700cc steering wheel, or attempt to fit it to a 451, it won’t work unless you change the resistors and the wiring.
If you have a 600cc car and wish to have paddleshift then the PCB is your only option but you really should make sure you get a paddleshift steering wheel designed for a 600cc car. These only have 1 electrical connection on the black cartridge on the back. 700cc and 999cc steering wheels have 2 connections on the back.
There are a number of gearshift PCBs available:
Smart (brabus)
Smartkits.net
Smartroniks
Smartshift
Although the boards look different, they all do the same job and are all fitted the same way.
Brabus Gearchange PCB
For 600cc Fortwo only
The PCB usually comes in a box, this just shows you what it looks like inside. There are 2 versions, up to 07/01/2002 and 08/01/2002 onwards. The older version had the ribbon cable and a 2 core cable (brown and brown/black). The newer version had the ribbon cable and a 2 core cable with a connector on the end.

The PCB plugs in under the SE Drive and attaches to the main wiring loom. Two wires are then either spliced into a wire going to the steering wheel or plugged into a connector under the dash. These match up with car manufacturing dates so if your car is made after 08/01/2002 then you will have the connector underneath the dashboard. If it’s before that date, you’ll have to cut and splice wires.
How Does It Work?
The wire that is used from the steering wheel is the return for the horn. Each paddle uses a different rated resistor and the horn uses no resistor. The gearshift PCB measures the resistance through this wire and can determine which of the three buttons have been pushed. Gear up, gear down or horn. More info about the resistors required in a section below.
Fitting The Pre-08/01/2002 Brabus Box
Remove the SE drive, disconnect the connector going to the underside of the SE Drive. Connect this to the paddleshift PCB and connect the ribbon cable of the paddle shift board into the SE Drive.
The gear change box (with PCB inside) is usually then placed just behind the ignition barrel.
You can then replace the SE Drive and cover. The paddleshift board has a pair of long wires coming from it (black and brown/black), you will need to discretely run these up to the back of the steering wheel. Remove the steering wheel and disconnect the single red connector (do not turn the ignition key until the steering wheel is plugged back in and refitted).
The red connector has 4 wires:
Green (airbag)
Purple (airbag)
Brown (earth)
Brown/Black (horn/paddles)
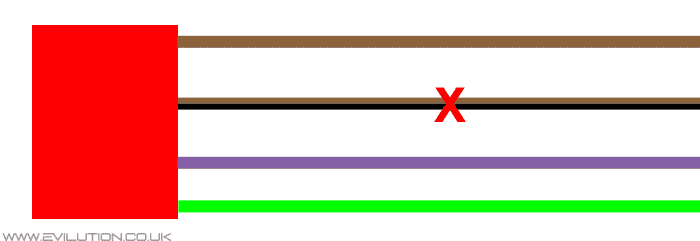
Cut the brown black wire a little way back from the plug. Bare the wires of both ends. Take the short length of brown/black cable connected to the steering wheel and connect it securely to the brown/black cable of the paddleshift board. Finally, take the brown wire from the paddleshift board and securely connect it to the brown/black wire going to the car. Tidy it all up, reconnect and refit the steering wheel.

Fitting The 08/01/2002 Onward Brabus Box
Remove the SE drive, disconnect the connector going to the underside of the SE Drive. Connect this to the paddleshift PCB and connect the ribbon cable of the paddle shift board into the SE Drive.
The gear change box (with PCB inside) is usually then placed just behind the ignition barrel.
You can then replace the SE Drive and cover. The paddleshift board has a pair of long wires coming from it with a plastic connector on the end, you will need to discretely run these up under the dashboard by the steering column where you’ll find 2 connectors with 2 wires going in and out. Disconnect these 2 connections and plug your long ribbon cable into one of them. It will only plug into 1 of them so you can’t get it wrong plus it’ll only go in 1 way round.
Hopefully it should work.
TAN Code
This option is only available if you have a 700cc fortwo, 999cc fortwo, Roadster or the newer version of the 800cc diesel fortwo with a SAM unit.
451 Fortwo
The code is applied to the car at a smart dealer, this code should cost around £100. The wheel should now be ready to go, no connections need to be moved over.
450 Fortwo
The code is applied to the car at a smart dealer, this code should cost around £100. When the paddle steering wheel is fitted, a connection must be swapped over in the drivers side footwell. Non paddle wheels use white/white, paddle wheels swap to the black plug.
The photo below is of the 450. The connector is generally easy to find and usaully visible.
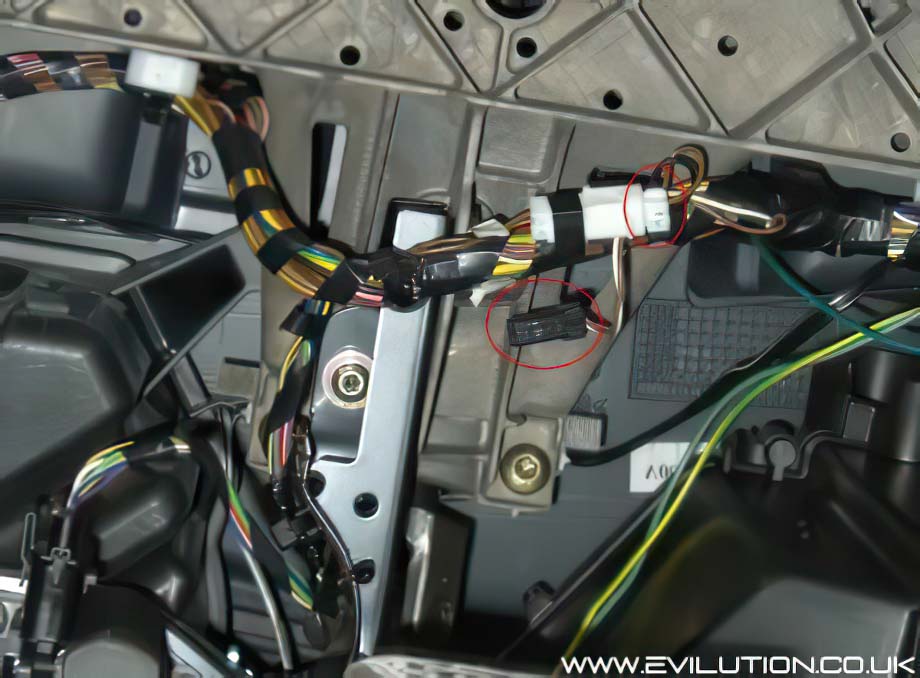
Thanks to Black Dog for the picture.
Paddles And Buttons
The official paddle wheel comes in a bunch of different types.
2 spoke Brabus (600cc only)
2 spoke (700cc only)
3 spoke found in the fortwo pulse and Roadster (700cc only)
V6 Roadster Brabuswheel (700cc only)
3 spoke wheel (999cc only)
There was never an official button change steering wheel but there have been many 3rd party and home made button shift wheels as it is a lot easier to make than paddles. There are also 3rd party paddle kits that fit to the standard steering wheels.
Differences Between Steering Wheels
The difference is very easy to see although both types of wheel look the same. Look at the black cartridge on the back of the wheel, you will notice either one or two electrical connections. If it has one connector, it is for a 600cc smart or early diesel. Two connectors signify it is designed for a 700cc and newer diesels.
The wheels with two connections can be used on 600cc cars simply by not using the extra wiring connection. The one connector version cannot be used on a 700cc smart.
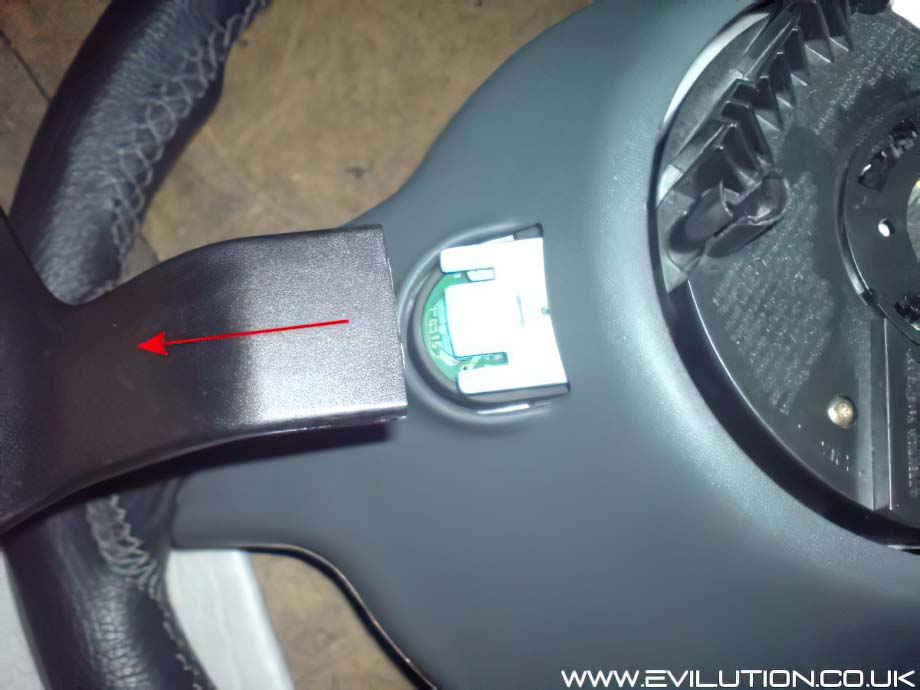
Disassembling The Steering Wheel
Disassembly of standard and both types of paddle wheel can be found here.
Recognising New And Old Style Paddle Wheels
Take a look at the pastic cowel at the back of the wheel, where the paddles exit:
Squared off – meaning it is an old style paddle wheel with bolted in paddles.

Rounded off – meaning it is a new style paddle wheel with clipped in paddles.
Paddle Resistances
This is not public knowledge, the people who know like to keep it to themselves. It’s part of their evil scheme to take over the world, probably. In the years I have owned a smart, I have read many supposed truths about the values of these resistors. The problem is that all of the 3rd party gear change boards use different values, somewhere along the line the truth was lost in the confusion.
Smart Standard Paddle Wheel (squared – old style)
600cc fortwo only
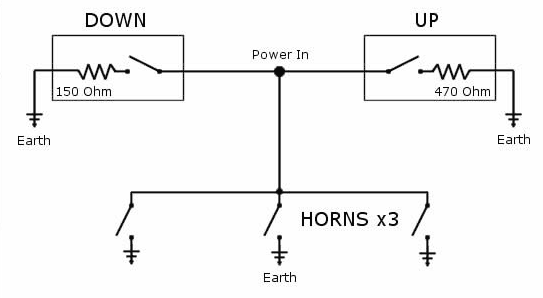
Horn – 0 Ohm
Up paddle – 470 Ohm
Down Paddle – 150 Ohm
Nothing pressed – no connection
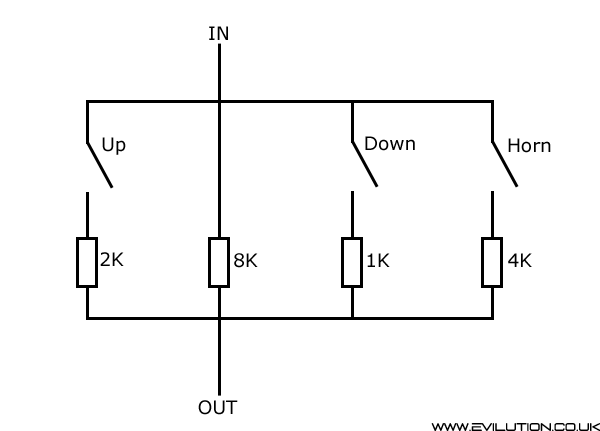
Smart Standard Paddle Wheel (rounded – new style)
700cc fortwo, Roadster.
Horn – 4K Ohm
Up paddle – 2K Ohm
Down Paddle – 1K Ohm
Nothing pressed – 8K Ohm
There is a big difference between the way the 2 are wired. The old style wheel used serial wiring and therefore only used 1 resistor at a time. The new style wheel used parallel wiring. This means that the 8K resistor is used as well as the horn, up or down resistor.
This would give a totally different resistance.
Horn = 8K + 4K = 2.66K combined
Up Paddle = 8K + 2K = 1.6K combined
Down Paddle = 8K + 1K = 0.89K combined
Smart Fortwo 451
The 451 is very similar to the 450 shown above except that the horn is on a different circuit.
Up paddle – 2K Ohm
Down Paddle – 1K Ohm
Nothing pressed – 8K Ohm
There is a big difference between the way the 2 are wired. The old style wheel used serial wiring and therefore only used 1 resistor at a time.The new style wheel used parallel wiring. This means that the 8K resistor is used as well as the horn, up or down resistor. This would give a totally different resistance.
Up Paddle = 8K + 2K = 1.6K combined
Down Paddle = 8K + 1K = 0.89K combined
There are 2 versions of the wiring depending on the manufacture date. Both can be found here.
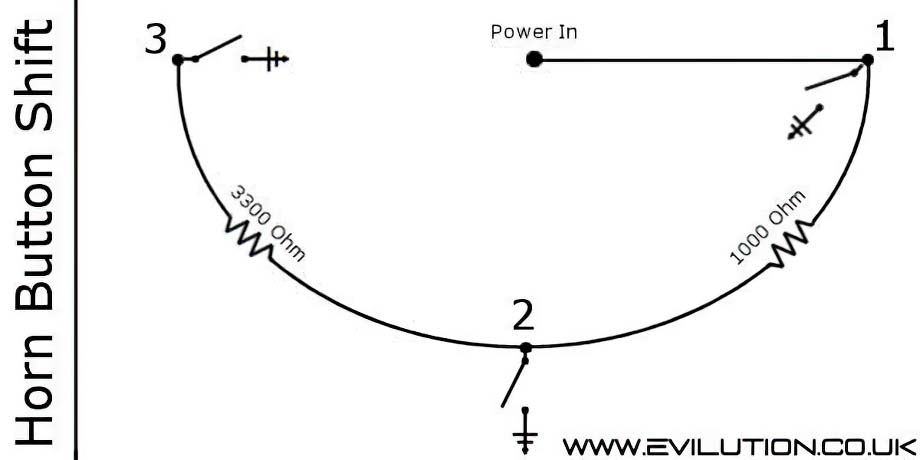
Smartshift, Smartronik, Smartkits
Although the Smartshift and the Smartronik are now discontinued, they are widely believed to share the resistances of the new ‘copy’ replacements sold by Smartkits and Smartarse Design. Horn – 1000 Ohm Up paddle – 0 Ohm Down Paddle – 4300 Ohm Wiring Differences There is one major difference between standard and third party wiring. The standard is wired in parallel, third party is wired in series.
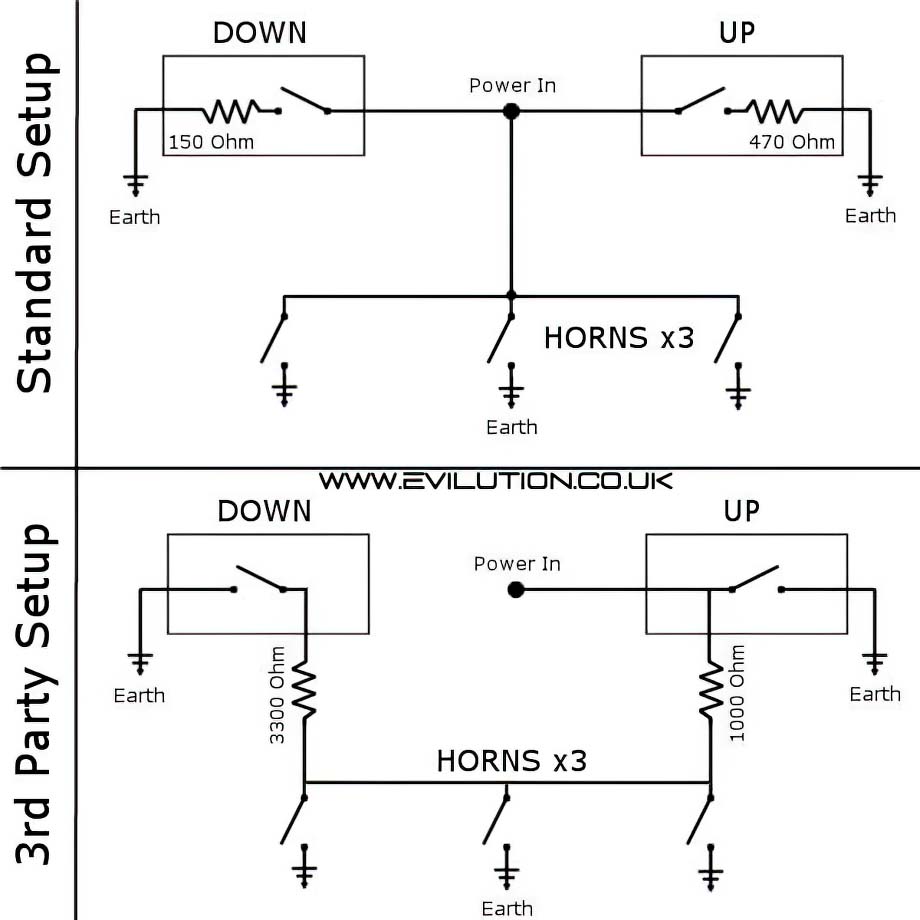
This means the down paddle on the third party wheel actually uses two resistors to achieve the 4300 Ohms. It passes through a 3300 Ohm resistor before going through the 1000 Ohm resistor used to trigger the horn, therefore giving the 4300 Ohms required. Resistor Codes 470 Ohm is also known as 470R (Resistance), making it easier to type. 470 Ohm is stated on SMD resistors by the numbers 471, thats 47 and 1 lot of zero (multiplier).
150 Ohm is also known as 150R and 151 on SMD resistors. 15 and 1x zero (multiplier). 1000 Ohm = 1K = 1000R = 102 (10 and 2x zero as the multiplier). 3300 Ohm = 3K3 =3300R = 332 (33 and 2x zero as the multiplier). ‘K’ stands for thousand and is used instead of the decimal point to stop it being missed out.
It might sound daunting but I can assure you it’s quite easy, i’ll hold your hand, don’t worry.
Resistor Colours
Because of the size of resistors, you distinguish the ratings using coloured bands. This is ok if you aren’t colour blind. Why they don’t just write it on the resistor i’ll never know. The system works on four, five or colour bands. Each colour represents a number. I will cover four and five bands here as six is rare and used for specialist resistors.

Can I Use The Horn Buttons Instead? Yes, you certainly can. You can adapt the steering wheel so the right horn shifts up a gear, the left horn shifts down a gear and the centre horn sounds the horn.
Switches 1, 2 and 3 are the original horn buttons, after the mod, 1 and 3 become up and down gear. Here is the link that shows you a few ways to add your own steering wheel shift.
I Fitted A Paddle Shift Wheel But The Horn Doesn’t Work
If you fit a paddle shift steering wheel to a car with a SAM unit, you have to have the car coded to make the paddles and the horn work. You also have to swap the cable under the dash. The connector reroutes the steering wheel wiring so it goes directly to the speedo instead of the SAM. The speedo takes the signals and works out what you are trying to do like use a paddle or the horn. It then passes the information through the CAN Bus to the SAM unit for the horn and to the ECU for the gear change.